Featured Post

Unique Bridal Party Gifts: Fun Ideas with Personality
Your bridesmaids have been by your side through every flower crown trial, Pinterest board debate,...
8
May
2012
I have a gorgeous DIY tutorial for you today and it comes in the form of one of my favorite flowers Gypsophila. The very lovely Tracey from Campbell’s Flowers who is based here in Sheffield has been kind enough to put the tutorial together for me. I am by no means telling you that you don’t need a florist for your wedding day, because I do feel that where ever possible you should get in the professionals to help you with your big day! BUT I do also realise that some brides don’t have the budget for this so have to do things like the bouquet themselves. So if this is the case this informative and easy to follow tutorial is just for you!

I’ll pass the Blog over to Tracey……..
Hello everyone, As a lover of all things pretty, romantic and vintage-inspired, I made a number of designs for a recent wedding fayre in Sheffield and contacted Kelly to see if she would like to feature one of my bouquets as a tutorial. I was delighted when she said yes – as an ex-advanced level tutor, there’s nothing I like more than helping DIY Brides.
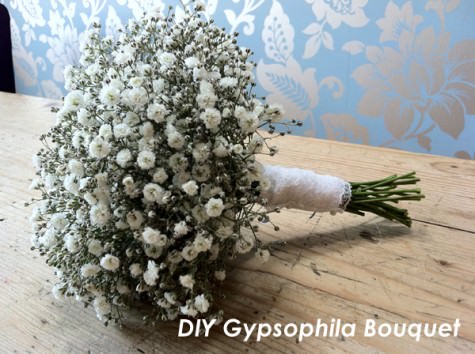
So, here’s a simple, step-by-step guide on how to put together these sweet little gypsophila bunches which could be used as a Bride’s bouquet, bridesmaids bouquets or even cut short as table decorations.
You will need
About 5-6 bunches of quite full, open gypsophila
String or raffia to tie with
Scissors
Ribbon
Pearlheaded pins
1) Start by removing all the lower leaves from your gypsophila – this is a bit fiddly and time consuming but its worth it. If leaves are left on they get in the way when you come to tie your design and can cause problems. Even worse, when they shrink they can make your design fall apart!

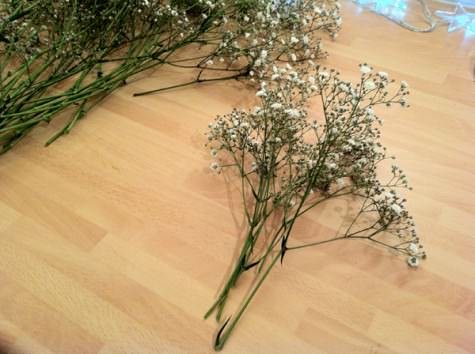
2) Cut all the side shoots off your gypsophila and keep everything. They can all be used later.

3) Collect all your stems into a bunch like this ‘til you have used all your stems up

4) Take a couple of stems into your hand and feed each new stem into your hand from the left (if right handed) or right (if left handed). This might be a bit tricky at first but be patient and keep trying – you will get the knack!

5) If you make sure you always place the new stem on top of the ones you have in your hand it should work and you will eventually end up with spiralled stems.

6) Your design should start to grow quite quickly and look a bit like this after you have fed about half a dozen stems into it.

7) After a short while your design should become a nice round ‘ball’ shape.

8] Next tie off your design – I’ve used some fancy florist’s tie, but string or anything non-slip will do. Don’t try and use satin ribbon as it can be a bit of a nightmare to tie with!

9) Cut the stems to the desired length. Florists generally use the ‘hand-width-and-a-bit’ rule, which looks attractive and is comfortable to hold. If you’re not confident about how long you want your stems, be cautious. As my lovely friend, and first Manager, Mel says “You can always cut them shorter, but you can’t stick them back on!”

10) Now time for the pretties! Choose some ribbon to add to your design – I’ve chosen white satin and lace, so delicate and romantic.

11) Bind off your design to conceal your tieing point with some pretty ribbon. (Sorry about the green nails but the reality of floristry is, it’s a bit messy!)

12) Then you can finish with some pretty lace to add a vintage feel to the design and secure with pearl-headed pins

13) Voila! There you have it and if you want to use up all those little bits and pieces you can make a tiny buttonhole to match using exactly the same techniques.

Good luck and my thanks to Kelly for featuring me on her blog – I’d love to hear through her how you got on, if you tried making this design. If you do struggle I’ve uploaded a few videos on YouTube which might make it a bit easier – just search under Campbells Flowers.
Tracey x
For more information on Tracey’s work go to
www.campbellsflowers.co.uk
FACEBOK
TWITTER
After an epiphany at Chelsea Flower Show over 10 years ago, Tracey decided to forgo the world of Advertising and Marketing and retrain as a florist. Since that time, her love of all things flowery has led her through jobs in retail floristry and a stint teaching at local colleges, to starting her own business – Campbell’s Flowers. Concentrating on good old-fashioned care and attention to detail, Tracey’s business is fast becoming one of the most talked about florists in Sheffield. Her design style focusses on using beautiful flowers in stylish simplicity, used naturally and as romantically as possible. She is a friendly soul whose main strengths lie in wedding flowers and workshops. Her delightful little workroom was recently described by one as her Brides as a ‘girl cave’!
As a very amateur church florist I have been asked to do the bouquets buttonholes etc for a friend. As she only wanted gyp I accepted but I am a bit unsure about how much I actually need. You say 5-6 bunches but about how many stems would this be?
I must also thank you for the tutorial. Its very helpful and sets my mind at rest. Thanks.
soooooooooooo lovely!
Thank you!! I am having a vintage inspired ‘DIY’ wedding and have been struggling to find flowers that I could a) afford and b) arrange myself. This is exactly what I was looking for, absolutely beautiful :-)
Hi,
How far in advance could I put this boquet together?
Absolutely gorgeous! Thanks for sharing!
Thanks for sharing little bit of post harvest handling.
Is it 5-6 bunches per bouquet?
Hi how far in advance can I make this?
Thanks for posting this! I would also like to know how far in advance these could be made? Do they have to be made the night before or could it be a few days before the wedding?
I’d say the day before would be fine, pop the stems of the bouquet in some water and finish off with ribbon the morning of the wedding. Hope this helps
Beautiful! How would you stop the stems from leaking/staining? We were having a play with some Gyp at the weekend and got green everywhere!!!
I’ve seen the baby’s breath spray painted, lightly, in gold and silver for winter weddings. The flowers look beautiful.
Hi
Just what do you class as a bunch and is it per bouquet the 5-6?
My daughter is getting married in 8 weeks and having 6 bridesmaids , so the idea of making up a gypsophila bouquet for each of them sounds a perfect idea. Your gypsophila instructions were very helpful and I had an attempt yesterday. I was very pleased with the outcome but the smell of these flowers is so very unpleasant. Will the smell eventually go? Any ideas please
How did you get rid of the smell from the baby’s breath? They look so beautiful but the smell is awful. Can you help with my query?
Thank you so much!
good post
very nic
Have you tried our fabulous wedding directory?
discover more