Featured Post

‘Marriage in Colour’ Bright and Bold Wedding Inspiration From France
I have been featuring a lot of colour on the blog over the past few...
I have been featuring a lot of colour on the blog over the past few...
10
Jun
2013
By Boho

Today I am delighted to invite Elise back to the blog. Elise Lévêque is an eco-conscious bride-to-be who writes for Wedding & Party Store in her spare time. last time Elise showed us how to make this super cute Felt Flower Bouquet. Today Elsie is showing us how to make a wedding planner folder, which is a simple and inexpensive way to keep all your wedding planning information all in one place.
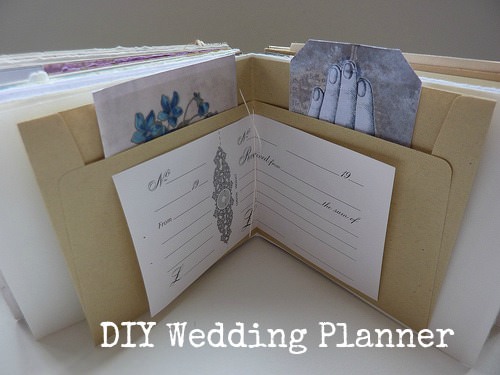
The planning of a wedding can be whatever you want it to be; fun, exciting, stressful, short or long. If you want to avoid the stressful part, you need to make sure you stay organised and one of the easiest ways to do that is with a dedicated wedding planner.
A wedding planner may feel like a frivolous expense (and it can be, when you’re looking at ornate ones in Paperchase or Selfridges) but if you use it properly it will be one of the most valuable items in your wedding arsenal. To make it even more special, and something you’ll look back at with the same fondness that you will for your wedding album, why not make your own?

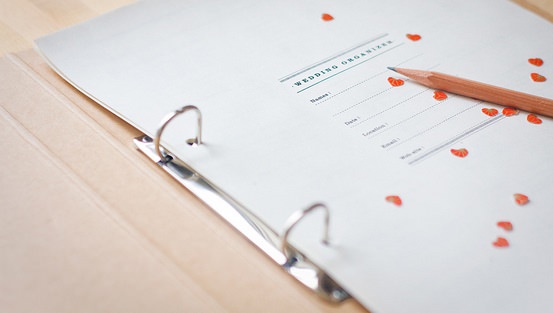
STEP 1) To start you need to decide what sections you want to include in your wedding planner, then design them on your computer. Possible sections could include; guest list, budget, venues, food & drink and honeymoon destinations. For each section, design a page using a word processer of your choice but don’t be afraid of blank space – this can be useful for making notes and doodling.
STEP 2) Get printing! You could opt for cream and brown paper, as shown here, or you could add pages of patterned or textured paper to your planner – whatever takes your fancy. A standard inkjet printer will work fine. Once the ink has dried, hole punch each page and add to your binder.
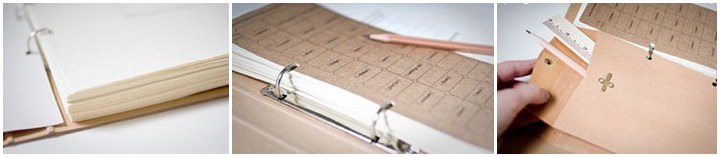
STEP 3) To divide your planner up into sections, you’ll need tabs so you can thumb through the pages and find what you’re looking for with ease. Simple brown paper or card works well, and if you don’t want to design your own there are numerous free printables available online.
To make your own, create a new document in your word processer and insert bevelled edged rectangles that are approximately 1.5 x 1 inches (3cm x 2.5cm). Print the name of each section of your planner vertically on the rectangle. When cut out and folded, these will form sturdy tabs that you can add to the edge of pages using a piece of double-sided sticky tape.

STEP 4) Take your selection of envelopes and punch a set of holes along the bottom of each one. Add at least one envelope to each section of your binder and use for smaller items such as receipts, ticket stubs and wedding planning keepsakes.

STEP 5) Your planner is now ready to decorate! Use stickers, ink stamps and paper crafts, or keep things simple with calligraphy. Save a sheet of stickers and either hole punch or tuck inside one of the envelopes so that you can use them to highlight a particular task or planning issue.
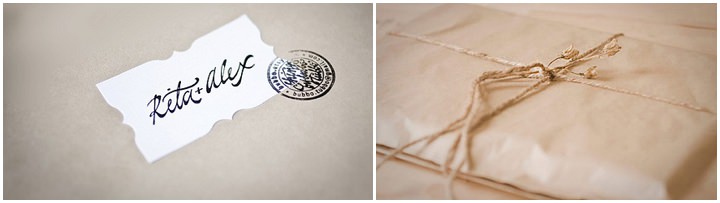
STEP 6) If the wedding organiser is a gift for someone, finish it by wrapping in brown paper and tying with raffia or ribbon. If you want to work colour into your organiser simply substitute the brown envelopes and binder for the colour of your choice. You could even opt for multi-coloured paper and ink, for a rainbow effect.
Elise Lévêque is an eco-conscious bride-to-be and blogger who writes for Wedding & Party Store. She can’t wait to add her own DIY touches to her special day.
Share this post


Love this! I’d love a keepsake after the wedding day with all my notes and fabric swatches and pretty pictures in it… will definitely have to make something similar :)