Featured Post

Ask The Experts: The Best Destinations for Honeymoons in Tanzania
If you and your partner want to visit an extraordinary destination for your honeymoon, consider...
If you and your partner want to visit an extraordinary destination for your honeymoon, consider...
11
Mar
2013
By Boho

I have a new Contributor to the Blog today her name is Elise. Elise Lévêque is a bride to be and blogger who writes for Wedding and Party Store. She can’t wait to add her own DIY touches to her special day. Today Elise is talking us through making Tissue Paper Flowers. These flowers or paper pom poms are SPO poular right now, they are cheep and easy to make and can add a really splash of colour to any wedding.
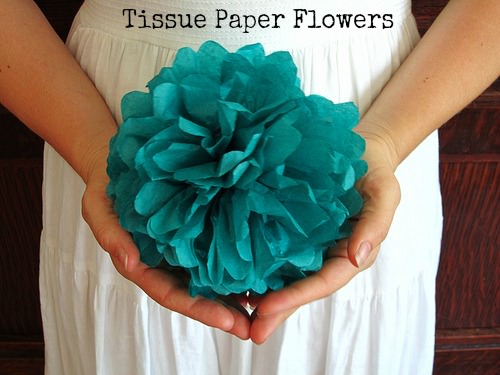
Image by sassycrafter
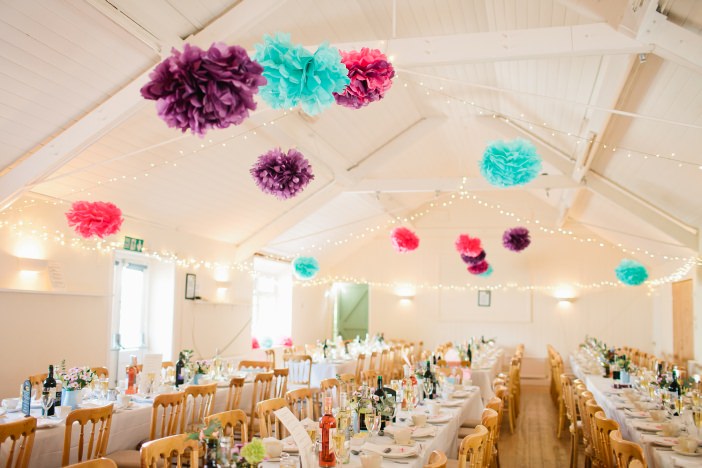
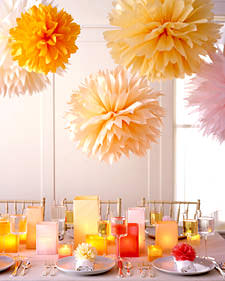
Flowers can make a wedding and really translate your chosen theme, but who says they have to cost hundreds of pounds? These paper flowers can be hung from the ceiling, used as table decorations and even appear in the bride’s bouquet – all for a fraction of the price of real flowers.
Paper or artificial flowers are also a more eco-friendly option, as they can be reused and won’t have been imported, dyed preserved like so many cut flowers.
This DIY tutorial shows you how you can make your own ‘pom-pom’ style tissue paper flowers that are so simple to make. Stored carefully in a box or similar, these flowers can be made well in advance of your wedding so why not invite a few friends over for dinner and get crafting!

Step 1) Lay your layers of tissue paper in a neat pile. You could opt for different colours to create a multi-coloured flower, or you could stick to one colour. Remember that the better quality your tissue paper, the less of it you will need. Hold the edge of the paper and begin to fold it back on itself, like a concertina.
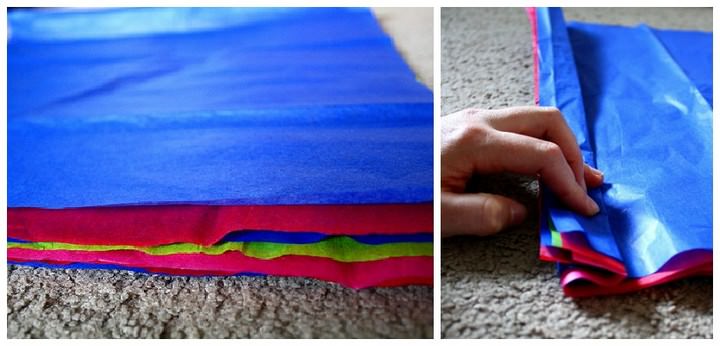
Step 2) Continue folding the paper back and forth until you’re left with a long strip about 2.5cm (one inch) wide. Use your scissors to trim each end of the paper – this pattern will give the illusion of individual petals. Shapes to try include a curved point, scalloping or creating an oval.
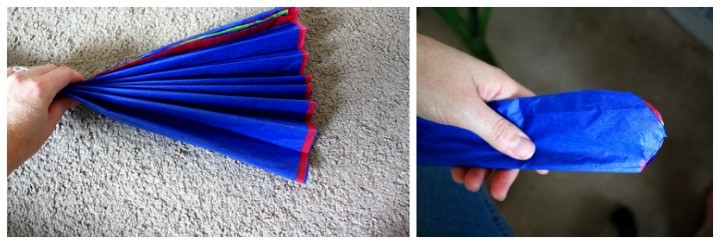
Step 3) Now pinch the middle of the paper together with your fingers and carefully secure with a pipe cleaner or length of craft wire. Leave enough excess to curl the wire to create a hook – this is what you’ll use to hang the flower once it’s finished.
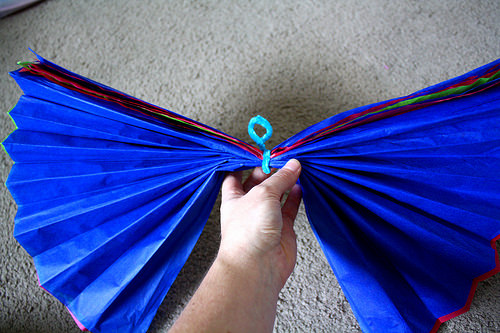
Step 4) Once the centre of the paper is securely fastened, you can begin to tease the folds apart, creating a set of ‘wings’, as seen in the shot above. Pull each layer of tissue paper upwards, towards the centre of the flower. This will eventually create a pom-pom-like shape.
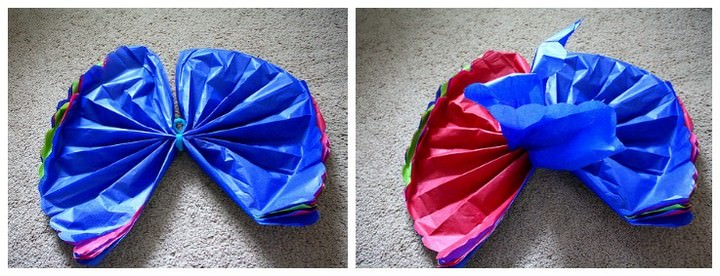
Step 5) Keep teasing out those layer of tissue paper and repeat on the other side, being careful not to crush the tissue. This is the fiddly stage but will allow you to craft the shape you want. Once you’re happy with the shape of the pom-pom flower, tie a length of invisible fishing wire to the hook you made using your pipe cleaner or craft wire.
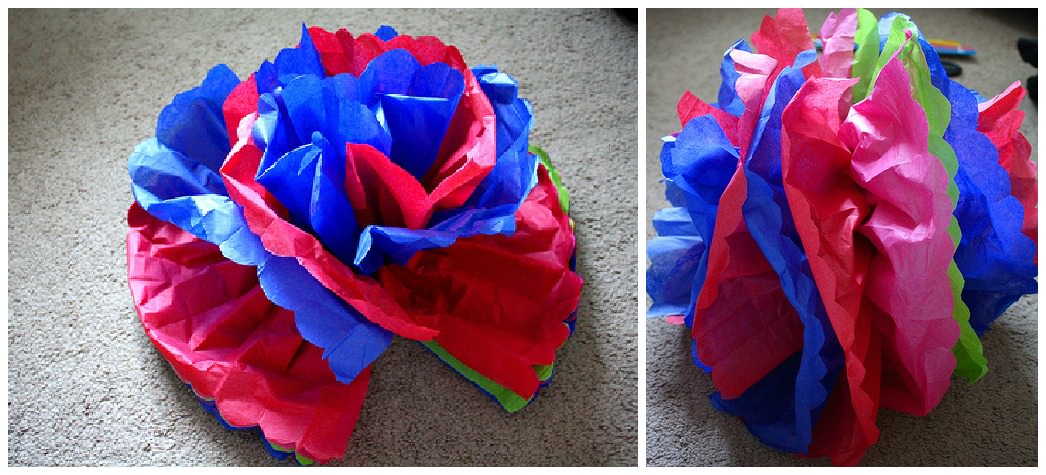
Et voilà! Your very own tissue paper flowers! Once you’ve made a few you’ll become a lot faster, and you don’t have to stop at wedding flowers – this DIY idea would also make great Christmas, Easter or birthday decorations. Simply tweak the colours of the tissue paper to create a new ‘species’ of flower!
Share this post


The tissue paper flowers can add such a great feel to an event. I always get a sense of spring when I see these flowers. I have never seen any done in browns/oranges for a fall look, I am not sure it would work as much as the ones pictured above do. I have seen these hanging from trees in a park setting to add to the environmental aspect, and it did a great job. Have you tried these at a fall or winter event?
I’ve only ever used bright colours but perhaps for fall you could make ones with even three of four colours in, such as orange and brown plus red and yellow, to give an ombre effect the flowers!
While I absolutely LOVE the idea of cutting costs at a wedding (because let’s face it, who doesn’t need the extra dough for other expenses?), I go back and forth on taking away from real flowers on your big day. While I have seen many silk flowers that are difficult to decipher between, I think you can definitely see the difference in real and paper flowers. If not done expertly, I think your wedding could end up looking like a child’s birthday party. Maybe if they are only utilized up high and in low lighting, they appear more life-like?
I agree that paper flowers aren’t the most life-like, but they add colour to any room and would look great when hung – I guess think of them more like an alternative to bunting rather than a bouquet!
It’s such a good idea and so cost effective….and on top of it, it looks great!
Thank you, so glad you like it!
Your post has taken me back to another time and place, a ceremony of a different where we used tissue paper flowers. We put on the Taming of the Shrew in 7th grade and created our own sets in true dirt cheap public school fashion. It basically came down to cardboard, construction paper, pipe cleaners, Elmer’s glue, and oodles of tissue paper. I made enough paper flowers to fill the Great Lakes–and found I enjoyed it immensely. Tissue paper flowers are so retro DIY back in the day and will never fade. Try interlacing tissue layers with iridescent paper. Have you done tissue crowns and tiaras yet?
Crafting is so therapeutic and great when there is an end goal like a production or a wedding. I’ve never heard of making a tissue crown or tiara but I might have to get Googling as the concept sounds great!
formal dresses canada
cheap wedding dresses
clavonna dresses
View more dresses, please click:http://www.clavonna.com/
For more dresses information, please email at :[email protected]
Have you tried our fabulous wedding directory?
discover more