Featured Post
Boho Loves: Team Hen – Modern Hen Party Accessories and Decorations
Hen parties, hen do’s Bridal showers, what ever you want to call them they are...
Hen parties, hen do’s Bridal showers, what ever you want to call them they are...
19
Jun
2012
By Boho
This morning I shared with you the photos that Jess Petrie took of my Birthday Party on 3rd June. (Full set of photos can be seen HERE) To cut down on costs and to make the day more personal to me and Nik, I did quite a bit of the decoration and details myself, so this afternoon I thought I would share with you a few of the DIY projects I set myself!
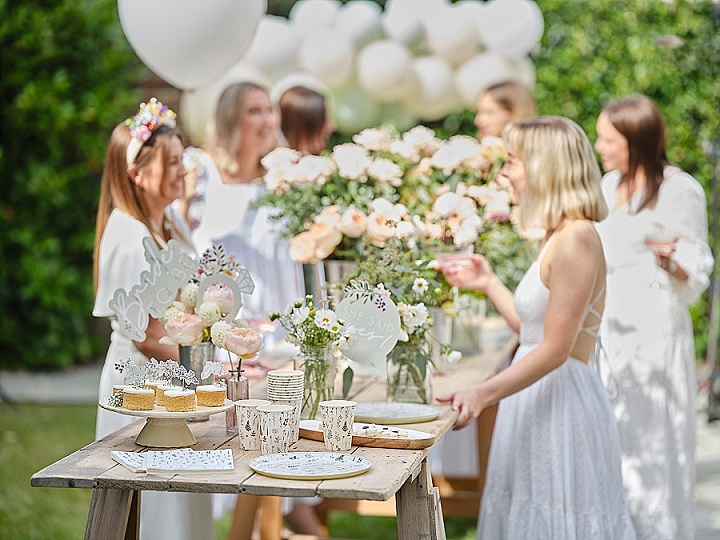
The main theme of the day was summer garden party mixed with rustic chic. We decided go with the natural decoration of the barn venue and not work against it, so we (when I say we, I mean me, Nik really didn’t have a say in the matter bless him!) decided natural tones and fabric. Nik’s favourite colour is green and mine is yellow so we decided to use the two together to create our colour scheme.
Here are the mood boards I put together a few months ago to work from


With these ideas in place, I emailed Lindsay at Bimbo Designs to help put the invitations together. I had a clear idea of what I wanted but she manged to make it reality and in speedy fast time to! Lindsay is a great graphic Designer and she offers printing options as well, I used her last year for my Boho Christmas cards, and she also does wedding invitations.


There were certain things I knew I wanted to make the room look pretty, some of these were going to be DIY projects and some of them were going to be things I could buy


To make the runners
♥ Buy enough fabric for the amount of runners you will need. I made 20 hassium runners and 20 gingham runners and bought the widest I could find.
♥ Cut the runner to the correct width, I made mine 75 cm and 2 meters long as I wanted to make them wide enough to cover most of the table. The gingham I did half the width but the same length
♥ I then hemmed each runner using a sewing machine. You may get away with using pinking shears for the gingham, but the hessian frays really badly
♥ Done…..simple!


How to make the vases
♥ You will need to collect an assortment of jam jars for. I found that using lots fo different sizes added variation to the arrangements
♥ making sure that the jam jar was clean and dry I took double-sided tape and wrapped it around the middle of the jam jar.
♥ Taking the ribbon I then stuck it round the jar on top of the tape, finishing off the end with an extra piece of tape
♥ I then repeated this process with different coloured ribbon until done
♥ Flowers were then purchased and cut to size


How To create your own Photo Booth
♥ Forst of all you will need a backdrop, I made mine from florists ribbon and a curtain rail.
♥ Taking 4 meter lengths I doubled over the ribbon and lopped onto the curtain rail
♥ I then repeated this until the curtain rail was full.
♥ For the blackboard I bought a piece fo cheep wood and painted with 3 coats of blackboard paint and then used a blackboard pen which stays on better than chalk
♥ The props were bought from joke shops, toy shops and across the internet
♥ A Fujji Instax camera can be bought for £50-£60 from Amazon
♥ I used a couple of old photo frames to hang the finished photos up with.
♥ Tapping nails into the back of the to photo frame I then wound string across to create the cris cross pattern
♥ Mini pegs were then used to peg up the finished photos.
You can download your own Photo booth sign by simply clicking on the sign below

So there you go! I hope you found all that useful? and that maybe I have inspired you or given you some ideas for your own party or wedding! Do let me know your thoughts.
* The Photo Booth with Instant Camera, Props, Blackboard sign and Backdrop, (with your own colour choice) is available for hire please email me [email protected] for more details*
Where to Buy
lanterns – www.paperlanternsuk.com
Straws – www.pearlandearl.co.uk
Suitcase – Ebay
Wooden crates – Ebay
Fabric for runners – Leeds market
Ribbon for vases – www.countrybaskets.co.uk
Ribbon for backdrop – www.countrybaskets.co.uk
Pegs and string – www.pearlandearl.co.uk
Blackboard paint and chalk pen – www.hobbycraft.co.uk
Share this post


I love the DIY photo booth and thinking of doing one for my wedding next year! Did you have someone to take the pictures or did guests just take it in turns?
Hi Toria, the guests took the photos with the instant camera, it was especially popular with the children! xx
Lots of lovely DIY-ing :)