Featured Post

James and Gemma’s Pampas and Dried Flowers Tipi Wedding in Sussex by Phoebe Rossi
Today I am sharing with you this delightful Sussex wedding, full of DIY charm. Gemma and...
Today I am sharing with you this delightful Sussex wedding, full of DIY charm. Gemma and...
4
Dec
2012
By Boho
Today I’m really pleased to welcome back Jen to the blog. Jen was on the blog a few weeks ago with her gorgeous Order of Service fans and today she is back to show you how to make the ever popular Tissue Paper Pom Poms, which were featured in her own wedding here. Jenny and Josh’s Relaxed, Handmade and Crafty Cambridge Wedding.
Paper Pom Poms have become one of the The most popular ways to decorate a wedding these days, they can be big or small, one colour or lots of colours, they are cheep to make and also can be pretty quick as well…..you just need to know who to do it! so thanks to Jen for today’s Tutorial
Jen also has her own craft Blog called Tea For Two which she runs with her twin sister Elena.

I’ll pass the Blog over to Jen……………
Hello everybody!
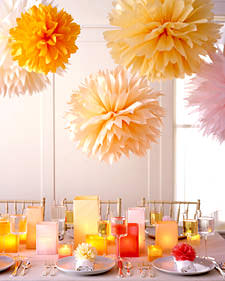
Aren’t these tissue paper pompoms beautiful?! I made these as decorations for my own wedding back in July, and they are so simple to make, but look so pretty! Here’s how to make them…

Step 1) Start by placing the eight sheets of tissue paper on top of each other. If you’re using different colours place them in the order you’d like them to appear. For example, I did a sort of ombre-coloured pompom with cream, pale orange and hot pink tissue paper so for that one I first laid two sheets of cream, then three sheets of orange, then three sheets of hot pink.
Step 2) Next, you need to fold them all together in a concertina style (like those homemade fans we all used to make out of paper when we were kids), in widths of about 5cm. Keep folding back and forth until you then have one long strip.
 Folding all eight sheets of paper together, concertina style
 Keep folding
 Keep folding
 One long strip
Step 3) Take a length of your string, twine or wool (you can use whichever – it just needs to not break easily) and tie it around the middle of the strip of folded sheets of paper, and tie securely. Don’t squash the paper, just tie around them to essentially keep them together.
 Tie string, wool or twine around the middle of the folded sheet of paper
Step 4) Next, cut each of the ends of this bulk of paper in a curve, as per the photo below. You can either do it like I’ve done in one long curve to a corner, or create a whole petal shape by cutting a semicircle to the middle of the top and then down again. It’s up to you – both look good and just create a slightly different effect to the pompoms. Experiment!
You’ll need to use fairly strong scissors to be able to cut through all of the paper together and keep it all in line at the same time.
 Cut a curve to the corner
Step 5) Then fan out your two ends (with the string still keeping everything together in the middle). Spread them out as far as they will go.
 Spread out the folds
Step 6) Next, take each sheet of paper and very carefully separate it from the one underneath. Be very careful not to tear them! (Although if you do it’s not the end of the world as it’s hardly noticeable!). You need to separate it and sort of puff it up.
I found it best by doing the four top sheets to create the first half of the pompom, and then turn it upside down to do the other four. Fluff them up and spread the petals out so you get a nice, even puffed up pompom!
 Step by step puffing up the pompom!
Step 7) And then you’re done! To get a really lovely effect tie invisible thread to that string/wool/twine loop in the centre of the pompom and hang them from here, there, and everywhere! They look really lovely in cascading groups of various colours, as you can see!

Enjoy crafting!
Jen x
Thanks so much Jen. Jen will be back in a few weeks to share with us another one of her fab creations.
For more ideas from Jen go to:
http://teafortwodiary.blogspot.co.uk
[email protected]
PINTEREST
Photo credits: Kirsten Mavric Photography
♥ You can find more DIY Tutorials HERE ♥
Share this post


Great tutorial! Thank you :-)
I love love love these!! Thank you for the tutorial.
Hmm I’m now thinking red and gold for Christmas decorations… will add tissue paper to my Christmas shopping list! :oD
Apparently these are really easy to make.
Jessica
http://sandiegofamilyportraits.com
Brilliant tutorial! Thanks! :-)
pom pom time heheh getting very encouraged to craft x
Thanks for the tutorial. I think these pom poms can be awesome hen party decorations too.
thank you so much for this!! i have been wanting one of these pom poms! i am going to give it a try1
This is fantastic and makes making them so easy. thank you
Great idea – could be quirky for hen party decorations in Ireland.
beautiful, thanks for this!
Hi,
Great tutorial! I am planning on making plenty of these to hang from the ceiling at my wedding venue… How many sheets on average does each one need?
Thank you
Just ordered some tissue paper to make these! Looking forward to making them as Easter decorations! :)
Hi Jen,
I am really happy to come across this explanation for making these pom poms. In school a long time ago we were taught how to do this but I just could not remember how and voila I was able to find your article. Thank you, this is going to come in real handy for a party I am in the process of planning.
Brilliant! Do you mind me asking where you bought your tissue paper from? I love the colours!
Great tutorial. My sister made these for her room & they look so beautiful.
This site was… how do I say it? Relevant!! Finally I have found something
that helped me. Thank you!
So glad we can help
Thanks for the tutorial! I’ll be making a bunch of these for a friend’s wedding but can’t figure out a good way to transport them to the venue. Any ideas? Thanks!
Just fold and tie them then un-ruffle them once you get there – (need to be a bit early obviously… not sure doing them at the service will go down too well!!)
I never thought that pom poms could be brilliant idea for wedding decorations until I read your post. I should try this for the coming Christmas. Thanks!
Have you tried our fabulous wedding directory?
discover more